Showing posts with label desserts. Show all posts

Chocolate Covered Pretzel and Peanut Butter Bites

Jul 23, 2012

Am I the only one that craves something sweet after dinner? 

Doesn't really matter how full I am, I still need chocolate. 

I am sure it is a mental condition, but it is not one that I am really willing to fix, so I continually search the pantry at about 8:00 to find something to satisfy my craving. 

The problem with this strategy is that my daytime self knows that my nighttime self will be ravaging the pantry and that it is a bad habit.  So, daytime self, the one who does the grocery shopping, doesn't buy a lot of sweet stuff, protecting night time self from over indulging.

Night time self is not fond of day time self. 

One particular evening, when nothing was found in the pantry, I decided I had to make something.  I remmeber a pin on pinterest that looked easy and quick, so I hopped on the computer and found the recipe. 

The recipe came from Stephanie's Kitchen and I didn't change it at all. 

Here is what you need:


Pretty simple ingredients.  That I always have around.  Since these ingredients can be used for so many different things ... day time self buys them without thinking she is doing any harm :)  Little does she know what night time self can come up with when challenged.

Combine peanut butter and butter and mix well until smooth.


Add the sugars and mix again.

The dough should look roughly like this and should be tacky and roll until balls easily.  If it doesn't, add a little more of each of the sugars until it rolls easily.

At this point, roll all the dough into small balls, using a teaspoon as your measuring guide.  You really dont' want to go big on the peanut butter here, it is very rich.  Roll all the balls first, then sandwhich each ball between two pretzels.


 Leave the pretzels in the freeezer for roughly a half hour.  Once the pretzels are ready, prepare the chocolate.  I used dark chocolate chips.  You can use whatever you think tastes best.  I melted them in the microwave, the double boiler and I are not friends.


Dip about half the pretzel into the chocolate.  Let the excess drip off.  Place back on tray - I covered the tray with foil so there would be much less mess and less sticking.

These were seriously delicious and were gone very very quickly.  I stored them in the refigerator so we didn't have a melty mess in the pantry. 

Chocolate Dipped Peanut Butter Pretzel Bites
makes about 50 sandwiches

1 cup of peanut butter
2 Tbsp softened butter
1/2 cup powdered sugar
3/4 cup brown sugar
Pretzels
1 bag chocolate chips

Hallie

Father's Day Dessert

Jun 13, 2012

So I haven't been feeling very crafty about Father's Day.  With all the summer time crafts we have been doing (and to be honest, I am still hung over from all the Mother's Day crafts), I am all crafted out.

That isn't very blog friendly, now is it??

What to do for Father's Day?  What to do, what to do, what to do????

They say a way to a man's heart is through is stomach, right?  So, let's cook!

Pecan pies is one of the hubby's favorite desserts.  Sadly, he doesn't hardly ever get it because nobody else likes it. 

I say I don't like it, but in actuality, I have never tried it. 

I have trouble with whatever the gooey filling is.  The texture does not look anywhere near appealing to me. 

So Pecan Pie would be an extra special treat for Father's Day.  So I hit the Internet in search of a recipe.

And I came across Pecan Pie Bars which looked delicious to me ... I mean ....

I came across these Pecan Pie Bars which I thought my HUSBAND would really really love. 

So we had to try them. 

Of course, I found this through Pinterest, from a blog called Just A Taste.

Without further ado ...

Assemble your ingredients* ...


Make your crust ...


Bake for 20 minutes ... meanwhile, get your filling ready ...


When your 20 minutes is up, pour filling on top of crust ...


Smooth over entire crust and put back in the oven .. bake for about 20 more minutes and remove and allow to cool.


Cut in to bars and enjoy!

And because I know you all are at the edge of your seat ... I did try these!  And loved them!

Pecan Pie Bars
Adapted slightly from Just A Taste

Ingredients:

For crust:
2 sticks butter, softened
2/3 cup brown sugar
2 2/3 cups all-purpose flour
½ teaspoon salt

For topping:

1 stick butter
1 cup light brown sugar
1/3 cup corn syrup
2 tablespoons heavy cream
2 cups pecans, roughly chopped

Directions:

Preheat the oven to 350ºF.  Line a 9x13-inch jelly roll pan with foil.  You will want to make the foil hang over the side of the pan so that after baking, you will be able to lift these right out of the pan.  No mess!

Crust:  Cream together the butter and brown sugar until fluffy.  Add in the flour and salt and mix until crumbly.  Press the crust into the foil-lined pan and bake for aprox. 20 minutes until golden brown.

Topping:  Combine the butter, brown sugar, honey and heavy cream in a saucepan over medium heat.  Stir constantly.  Simmer the mixture for 1 minute, then stir in the pecans.

Remove the crust from the oven and pour the filling over the hot crust spreading to cover the entire surface.

Return the pan to the oven and bake an additional 20 minutes.

Remove pan and allow the bars to fully cool in the pan.

Use the foil to lift out the bars and transfer them to a cutting board.

Peel back the foil, slice into bars and serve.

Hallie

*If you noticed that those were NOT the right ingredients, you win 1,000,000 points.  Apparently, I forgot to take a picture of the ingredients.  So those are corn bread ingredients!

Thick and Chewy Chocolate Chip Cookies

May 28, 2012


I have been searching for a new chocolate chip cookie recipe for awhile.  The last time I made the one on the back of the Nestle bag, well, let's just say they left something to be desired.  They came out really flat.  And not a lot of taste.  I needed something different. 

So I searched.

And searched.

And searched.

It seems every blog out there claimed to have the "Worlds' Best Chocolate Chip Cookie Recipe".  They certainly all couldn't be world's best, right?

My neighbor lent me a cook book and I decided to start there.   This recipe is from Baking Illustrated and I have to say, it is delicious.  World's Best?  Quite possibly ... I don't think I have tried enough to give it that title, but these disappeared in my house very quickly.  And I won't be looking for a new recipe anytime soon.

You really should try them. 

Probably you should workout first as you might eat the whole batch.

And if you worked out first, then you wouldn't feel so guilty. 

Still a little guilty, because you did eat the WHOLE batch, but not quite so guilty.

Thick and Chewy Chocolate Chip Cookies
Recipe from Baking Illustrated

2 cups plus 2 tablespoons all-purpose flour
1/2 teaspoon baking soda
1/2 teaspoon salt
12 tablespoons unsalted butter, melted and cooled until warm
1 cup packed light brown sugar
1/2 cup granulated sugar
1 large egg plus 1 egg yolk
2 teaspoons vanilla extract
1-1 1/2 cups semisweet chocolate chips

1. Adjust the oven racks to the upper- and lower-middle positions and heat the oven to 325 degrees. Line 2 large baking sheets with parchment paper or spray them with nonstick cooking spray.

2. Whisk the dry ingredients (flour, baking soda, and salt) together in a medium bowl; set aside.

3. Either by hand or with an electric mixer, mix the butter and sugars until thoroughly blended. Beat in the egg, yolk, and vanilla until combined. Add the dry ingredients and beat at low speed just until combined. Stir in chocolate chips.

4. **Here is where it gets crazy - Baking Illustrated recommends forming your cookies this way to get a nice jagged edge on top, leaving them looking very professional.  It takes one of two to get the hang of it, but I do recommend it, they come out great!**  Roll a scant 1/4 cup of the dough into a ball. Hold the dough ball with the fingertips of both hands and pull into 2 equal halves. Rotate the halves 90 degrees and, with jagged surfaces facing up, join the halves together at their base, again forming a single ball, being careful not to smooth the dough’s uneven surface. Place the formed dough balls on the prepared baking sheets, jagged surface up, spacing them 2 1/2 inches apart.

5. Bake until the cookies are light golden grown and the outer edges start to harden yet the centers are still soft and puffy, 15 to 18 minutes, rotating the baking sheets front to back and top to bottom halfway through the baking time. You do not want to over bake these.  Cool the cookies on the sheets.

Hallie

Margarita Cookies

May 4, 2012


One last treat for Cinco de May week ... Margarita cookies! 

I can honestly tell you that I think these are the best cookies that I have ever had.  Ever.  And that says a lot coming from a die hard chocolate girl.  They are very light and fresh tasting and have a yummy lime flavor. 

I can take no credit whatsoever for this recipe, I found it on a fabulous blog called Bakingdom and did not change a thing about the recipe for the cookies. 

Here it is:

Margarita Cookies
Ingredients:
3 tablespoons fresh squeezed lime juice
1/4 cup milk
1/2 cup (1 stick) butter softened
3/4 cup sugar
1 egg
1 tablespoon tequila
2 teaspoons finely grated lime zest
1 3/4 cups all-purpose flour
1 teaspoon baking powder
1/4 teaspoon baking soda
Pinch of salt

Lime Frosting* - (This I did alter slightly from the original recipe)

1 cup (2 stick) butter, softened
3 to 4 cups confectioners’ sugar
1 teaspoon vanilla
1/4 cup lime juice
1 tablespoon tequila
3 teaspoon finely grated lime zest

*This makes enough frosting to frost 2 batches of cookies.  I have never tried cutting the recipe in half, so I wasn't sure how it would turn out and didn't want to post the recipe if I hadn't tried it.  My answer to this problem ... Make 2 batches of cookies ... I promise, they won't last long!

Directions:

Preheat the oven to 350 degrees. Line 2 baking sheets with parchment paper or spray with cooking spray.

In a small bowl, combine the flour, baking powder, baking soda, and salt; set aside.

In a large bowl, cream the butter and sugar together until fluffy. Beat in the egg, then add the lime juice, zest,  milk, and tequila. Mix well. Mix half of the flour mixture in with the wet ingredients; stir until combined. Add the remaining dry ingredients and mix again.

Drop tablespoonfuls of batter onto baking sheets, leaving room for the cookies to spread. Bake for 12 to 15 minutes, or until cookies start looking firm on the outside. Allow to cool on the sheets for 2 minutes, then transfer to wire cooling racks. Cool completely before frosting.

To make the frosting: Cream butter until light and fluffy.  Add the 3 cups sugar and beat until the mixture comes together. Mix in the vanilla, lime, and tequila and beat until fluffy. Add more lime juice or more powdered sugar if the consistency needs adjusting.  Add the zest and stir well.

We really hope that you have enjoyed Cinco de Mayo week on Try One.  We have had a lot of fun with it and will probably be doubling up on our challenge exercises to make up for all the calories we have consumed this week. 

Or maybe we will just buy bigger pants!

Hallie

Homemade Churros

May 2, 2012


My husband's family is Italian and he grew up eating fried dough. Bread dough fried and then sprinkled with powdered sugar or cinnamon sugar or served plain to eat with a meal. I'm from the Midwest and grew up eating portions of canned biscuits dropped into oil and then rolled in cinnamon sugar. We only had them on fondue night though. Who wants to waste a large vat of oil? The Princess loves both of our versions. However, after eating these churros, I think she's found her favorite.

I will be honest. I had to make the churros twice. The first time I made them I made the dough the day before and refrigerated. I set the dough out to come to room temperature while the oil was heating, but the oil reached 350 degrees and the dough wasn't ready, but I went ahead and started making them anyway.

BIG mistake.

The dough was so thick that when I tried to pipe through the star tip, it pushed the tip through my bag and created a large hole. I figured the only problem would be that they ended up thicker, but still good.

Wrong-O.

They were so thick that the outside got crispy and brown and the inside was completely raw dough. Gooey sticky raw. My husband ate some and said they were tasty. I was gagging, but since there were no eggs in the dough, I didn't stop him. Gross doesn't always equal food poisoning...I have to pick my battles. Of course I couldn't let it go. I had to start all over and fix my mistakes.

Thankfully, the recipe is very simple and starts with an easy cooked dough.


Dough
1 cup water
2 1/2 Tbsp white sugar
2 Tbsp vegetable oil
1/2 tsp salt
1 cup flour

Topping1/2 cup sugar mixed with 1 tsp cinnamon

Combine water, sugar, salt, and oil in saucepan and bring to a boil. Once boiling, remove from heat and add the flour. Stir until mixture forms a ball.


Add dough to a piping bag or large ziplock bag fit with a star tip (I used Wilton 1M). Pipe dough into oil several strips at a time. Mine were about 3-4 inches long.


Fry until golden brown. I fried mine for about a minute and then turned them over and fried another minute. Once done, drain on paper towels and then roll in sugar mix.

The Princess called them crunchy sweet fries. I would describe them as a mix between a Taco Bell cinnamon stick thing and hot fried dough.


Nothing bad about that.  Definitely try these!

For full recipe go here

* If you don't have a star tip, these will still be fine. You could use a round tip or just cut a hole in the corner of a ziplock bag. These were roughly the diameter of a sharpie. I wouldn't go any larger than that.

* While piping the second batch into the oil I noticed another difference from the first batch. The second batch floated...the first batch sank. It was pretty clear that I should have sat the dough out much earlier to warm to room temperature. However, in the future I won't mess with making it the day before. The dough is so simple to make, it really doesn't save much time.

Bryn

Healthified Treats ... are they worth it??

Apr 25, 2012

Well, I think I would answer that question with one word ... Sometimes.  There are some treats that you can switch out a few ingredients and end up some something wonderful.  Bryn is going to share a treat she makes with a can of pumpkin that is totally delicious and well worth the switch.  The treats I attempted to make today, were not really worth it.

I had such high hopes.  But when I did the math, I should have known better.  By making this switch, I would have saved 215 calories and 66.5 grams of fat in one pan of brownies. 

Holy Cow!  I could eat the whole pan and not feel guilty. 

Well, maybe not the whole pan. 

But half, definitely half.

Not only would I be saving all that fat and calories, but I would be adding 24.5 grams of Fiber and 24.5 grams of Protein.

Sounds to good to be true, right?

Yea, I should have know, but I was blinded by the chocolate.  And that half pan of brownies I was going to enjoy all to myself.

Anyone guessed the mystery ingredient yet?

INSERT PICTURE

Black Beans!

It is all over the web.  People are raving about black bean brownies.  You would think they were better than sliced bread when you read some of these posts.  So I had to try them.  I was blinded by the numbers, what a great switch this could be. 

Here are the contenders:

In this corner, we have Ghirardelli Triple Chocolate Brownie Mix and a can of black beans.


In this corner, we have Ghirardelli Triple Chocolate Brownie Mix, plus egg, plus oil, and water.

 
For the black bean version, you puree the black beans (after they have been rinsed and drained) with a can of water in the food processor. 


You end up with a chocolate looking liquid.  So far so good.  The only other thing you do is mix your bean puree with the brownie mix.  That is it.  Pour it in the pan. 

I prepared the control group per the box instructions with the oil, water, and egg.  Pour it in the pan and bake.

The difference is noticeable as soon as you take them out of the oven.


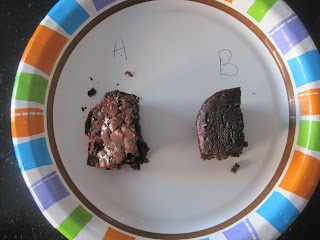
On the right is the traditionally prepared version.  On the left, the black bean version.


This is hubby's blind taste taste plate.  His exact words about sample B (the black bean version), "These are some weird low fat version, right?"  He did not care for them.  Now sometimes, he can be picky.  And sometimes, when he knows I have been goofing around with stuff in the kitchen, he has his guard up too high.  So I scoff at his opinion at first.  Let me try, I think.  I mean, people on the web are crazy about these things!  And we all know that people on the web are always right, right?  So, I try.  And well, bust.  I didn't even finish my little piece.  Yuck.  The kids, one of whom will eat anything, and I do mean anything chocolate, would not eat them. 

Have you tried these with any success? 

I am always looking for ways to make things healthier, but it still has to taste good and this one unfortunately fails. 

Heard of any other weird substitutes you would like us to try?  We'd love to hear about them!  For now, I am back to just switching to applesauce in the brownies.

Hallie

Banana Ice Cream

Apr 11, 2012

I love easy.

I love simple.

I love healthy and wholesome.

What could be easier and more simple than a one ingredient recipe? And if that one ingredient was a banana???

Totally healthy and wholesome.


The Kid won't eat bananas. They give her the body shivers when she puts them in her mouth. It's a texture thing :). But if it's in a smoothie, she's totally on board. Turn it into ice cream? She's getting out the spoons.
When I first saw banana ice cream on "Five ingredient fix," I was more than skeptical. I mean...a banana? How? I tried it just to prove how absurd an idea it was. And...I was wrong. Very. Wrong. It's smooth and creamy and very tasty. We've made it plain and also with extra ingredients like peanut butter, honey, chocolate sauce, chocolate chips, and ovaltine mixed with a little bit of milk before adding.
Try it...you'll like it :)

You'll need:
Ripe bananas
Blender or food processor
Additional add ins or toppings

Directions:

Peel and chop your bananas. Freeze in a single layer until frozen, 1-2 hours. ( If I'm not ready to make the ice cream after they've frozen I will place them in a container and use at a later time).


Now place the chunks into the blender or food processor. I've used both. I like the food processor better, but that's just me. Both work fine. Pulse a couple of times to break up the chunks and then blend. You will need to scrape down sides several times.


If you're feeling impatient, you can add a bit of milk, but you'll find that if you continue blending, it WILL come together and turn into yummy creamy soft serve type ice cream. At this point add in your additional ingredients and blend just to combine and serve.


- I prefer my ice cream a little more firm and I will put mine back into the freezer for a bit to harden.

The things I do to make The Kid smile

Apr 2, 2012


Today I made a 4 year old smile. I mean really smile. Ok, she tends to smile quite often...and I'm responsible for a fair amount of them. But this smile wasn't planned. I didn't tell a joke or go out of my way to bring forth a grin. I caught her smiling. Just pure joy. I should have known that brownies and peeps would bring a grin or two....

A couple of days ago I remembered that Easter is closer than I'd thought. I hadn't decorated (done), bought egg dye (done) or made any fun treats (done and done). As far as the treats went, I wanted to make something cute, fun, and new. As I was pulling out Hallie's doughnut pan that I hijacked (I'll return it soon....maybe), I had a vision. A vision of a peep nest.


I started with boxed brownie mix. Don't judge! I wasn't sure if they would work in the pan and I didn't want to waste the time or ingredients....why am I defending myself??? Anyway. Brownie mix into doughnut pan sprayed with Pam. Into 350 degree oven for 13-15 minutes. I let them cool for 10 minutes and then carefully went around the edges to release the yummy crispy brownie edges. Are you still judging? I can feel it...


The Kid then "helped" me dye coconut green and add to the brownie nest, sprinkle with egg shaped sprinkles, and add a peep. Cute. And this is when I caught her . I started cleaning the mess and turned around and she was eye level with her new creation with the hugest grin. I'm not sure if she thought it was cute, was proud of what she made, or was thinking of eating the little bird and his home. But it doesn't matter...I was just happy to see that smile.

I also made these cute little brownie bites with the leftover batter ... waste not, want not, right?

Blog contents © Try One ... 2012. Blogger Theme by Nymphont.