Showing posts with label healthy snacks. Show all posts

Sweet Potato Biscuits

Aug 22, 2012


Since school started, it seems my Internet searches can be boiled down to two things ... school lunches and after school snacks.  I have been looking for different things, I get so sick of packing the same old stuff every week, I am sure #1 gets sick of it too!  I found this recipe for sweet potato biscuits on the Weelicious site and it looked interesting.  Plus, I had never made homemade biscuits before (and these were going to be packed with vitamin A), so I decided to give it a shot. 

Sweet Potato Biscuits

2 cup all purpose flour
2 teaspoons baking powder
1/2 teaspoon baking soda
1 teaspoon salt
1/4 cup butter, chilled and cubed
1 cup sweet potatoes, cooked & mashed (I used the microwave)
1/3 cup milk
2 tablespoons honey

Preheat oven to 400 degrees.

Combine Flour, Baking Powder and Soda and Salt in a food processor.  Pulse a few times to combine.  Now add butter and continue to pulse until butter is evenly distributed and mixture is crumbly.

Add the rest of the ingredients and pulse till fully combined.  Should look roughly like this:


Dump out your dough onto parchment paper.  My dough was extremely sticky.  I added a bit more flour to make it more tacky than sticky.


Knead a few times, just to make sure everything is combined then shape into a circle.  Every recipe for biscuits I looked at said be sure not to over knead ... so don't over knead!!  Place another sheet of parchment on top and roll out dough.  You want this about 1/2" thick. 


The girls were helping with this snack, so they chose to make heart shaped biscuits.


Place cut out biscuits on a parchment lined backing sheet - spray parchment lightly with cooking spray to prevent sticking.


Bake for aprox. 15 minutes. 

Don't these look yummy?


We gobbled them all up!  I got 18 small biscuits and they were gone in about 2 days!

Enjoy!

Hallie

Mango Slushie

May 23, 2012


Super easy and very nutritious recipe coming at you today.

We are part of a fruit/veggie co-op.  You know, where you buy the basket of locally grown produce without knowing what is in it.  It is a fantastic deal financially.  The price can not be beat.  But sometimes, we get a few things that we don't know what to do with.  Like brussel sprouts.  Or cauliflower.  And if you end up wasting a few of the items, well, then it's not such a good deal.

Enter Mangoes. 

When my kids were babies, they both LOVED Mangoes.  LOVED, LOVED, LOVED.  It was by far their favorite.  We bought them at Costco they loved them so much.  But now, I can't get them to touch them.

"They are too slimey" says #1. 

"Too slippy" says #2. 

Grr.

"If you would try it, you would like it" I said. 

But no can do. 

I love Mangoes because of how good they are for you.  High in fiber, high in Vitamin C and Vitamin B6.  High in Vitamin A, which is great for eye health.  Good iron content for those that have anemia issues.   High in potassium, copper, and magnesium.  (Source:  Organicfacts.net) I read somewhere once that if you poured Mango juice on a virus, it would kill it.  I don't know if  that is true - but if so, we should all be eating more Mango!

So back to the issue - I've got two Mangoes and two kids that I would like to eat them.  And then the light bulb goes on ... slushie!  The kids will eat anything labeled a slushie!

Here is what you need:

2 Mangoes
Ice
1/4 Cup Apple Juice
Water

So, cut up your two mangoes and freeze them.


But be careful when you do this as mine were so juicy that then the juice froze to and when it came out of the freezer, well ... let's just say that I could hold the plate upside down and nothing moved.  Oops.  10 seconds in the microwave solved that problem though!

Toss the mango, a couple of cups of ice, and a 1/4 cup of apple juice into the blender and blend away.  I ended up adding a little water to the mix to get to the right consistency. 


Pour into glasses and serve.  The kids really loved it.  Both asked for more.  It was the perfect snack and not slippy or slimey at all!

Enjoy!
Hallie

Healthified Treats ... are they worth it??

Apr 25, 2012

Well, I think I would answer that question with one word ... Sometimes.  There are some treats that you can switch out a few ingredients and end up some something wonderful.  Bryn is going to share a treat she makes with a can of pumpkin that is totally delicious and well worth the switch.  The treats I attempted to make today, were not really worth it.

I had such high hopes.  But when I did the math, I should have known better.  By making this switch, I would have saved 215 calories and 66.5 grams of fat in one pan of brownies. 

Holy Cow!  I could eat the whole pan and not feel guilty. 

Well, maybe not the whole pan. 

But half, definitely half.

Not only would I be saving all that fat and calories, but I would be adding 24.5 grams of Fiber and 24.5 grams of Protein.

Sounds to good to be true, right?

Yea, I should have know, but I was blinded by the chocolate.  And that half pan of brownies I was going to enjoy all to myself.

Anyone guessed the mystery ingredient yet?

INSERT PICTURE

Black Beans!

It is all over the web.  People are raving about black bean brownies.  You would think they were better than sliced bread when you read some of these posts.  So I had to try them.  I was blinded by the numbers, what a great switch this could be. 

Here are the contenders:

In this corner, we have Ghirardelli Triple Chocolate Brownie Mix and a can of black beans.


In this corner, we have Ghirardelli Triple Chocolate Brownie Mix, plus egg, plus oil, and water.

 
For the black bean version, you puree the black beans (after they have been rinsed and drained) with a can of water in the food processor. 


You end up with a chocolate looking liquid.  So far so good.  The only other thing you do is mix your bean puree with the brownie mix.  That is it.  Pour it in the pan. 

I prepared the control group per the box instructions with the oil, water, and egg.  Pour it in the pan and bake.

The difference is noticeable as soon as you take them out of the oven.


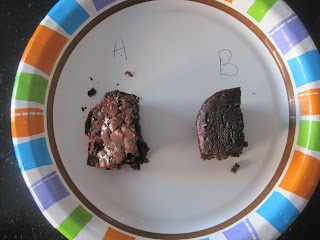
On the right is the traditionally prepared version.  On the left, the black bean version.


This is hubby's blind taste taste plate.  His exact words about sample B (the black bean version), "These are some weird low fat version, right?"  He did not care for them.  Now sometimes, he can be picky.  And sometimes, when he knows I have been goofing around with stuff in the kitchen, he has his guard up too high.  So I scoff at his opinion at first.  Let me try, I think.  I mean, people on the web are crazy about these things!  And we all know that people on the web are always right, right?  So, I try.  And well, bust.  I didn't even finish my little piece.  Yuck.  The kids, one of whom will eat anything, and I do mean anything chocolate, would not eat them. 

Have you tried these with any success? 

I am always looking for ways to make things healthier, but it still has to taste good and this one unfortunately fails. 

Heard of any other weird substitutes you would like us to try?  We'd love to hear about them!  For now, I am back to just switching to applesauce in the brownies.

Hallie

Why we love it Wednesday: Chobani!

Apr 19, 2012


Have you discovered this stuff yet?  I know I am late to the Greek Yogurt party.  My sister in law has been eating it for years I think.  But, better late than never.  Yummy is all I have to say.  And no fat.  And 14 grams of protein.  Great for breakfast.  Great for a snack.  I eat this almost everyday.  Blueberry is my favorite.  Followed closely by strawberry.  This is also great in dips.   Here are a couple of new ways that I have been enjoying my favorite snack.

Vegetable Dip


Mix 2 plain Chobani Yogurts with a package of Hidden Valley Ranch Dip seasoning packet.  Enjoy with carrots, green peppers, celery, etc.  Really good.  This has really helped me get my veggies.  I really liked it, but the kids preferred the "real ranch".

Peanut Butter Dip


Mix 1 Vanilla Chobani Yogurt with 1/2 cup peanut butter and a dash of cinnamon.  I actually ended up adding a little bit of honey too.  I served this with apples for the kids afternoon snack and they loved it.  A winner all around here.

If you haven't tried it, go out there and get some!  If you already love it, make sure you are buying it at Costco, it is at least $0.20 cheaper a container. 

Hallie

Strawberry Yogurt Nutella Bites

Apr 12, 2012

In our first edition of, I Saw it on Pinterest ...

Does anyone else have trouble spelling Pinterest?  For whatever reason, I can't seem to ever get it right.  Anyhoo ...

Who is obsessed with this site?  Show of hands please.  Now, of all the things you have pinned, how many things have you actually baked/made/created/finished?  Uh yeah, that is what I thought.  So 'I saw it on Pinterest' is dedicated to actually DOING some of the things we have pinned. 


Now this particularly yummy thing, I did not see on Pinterest.  But it was inspired by what I saw on Pinterest.  So, let's start there.

Frozen yogurt bites.  You can see the pin HERE.  I tried to find the original owner of this one, but I could not track it down.  If you know who first created these yummy treats, please let me know and I will give them proper credit! 

They turned out great and are so easy to make.  I imagine we will be eating these a lot this summer!


Here are the instructions:

Buy a container of your favorite yogurt.  Empty contents of said container into ziplock bag.


I put the ziplock bag over a cup so that I don't have to hold it.  Much less messy this way.
Cut just a very small tip off the corner of the ziplock bag. 


Squeeze small dots onto foil lined pan.


I got 50 out of one 6 oz container of yogurt.  Place pan in freezer.  Freeze two to three hours.  Enjoy!  The kids gobbled these down in one sitting, so you might want to make a few batches!

While eating these, I thought, you know what would make these even better?  Nutella!  Because Nutella makes everything better.  Everything.  Really, everything.  So my brain got to working and I came up with ...

Strawberry Yogurt Nutella Bites.  Yeah, so the name isn't catchy.  I didn't have a lot of time to brainstorm.

Gather your ingredients!


Nutella, yes, you NEED the giant size container.  Strawberry yogurt or whatever variety you think would make a good combo.  I am going to try key lime next.  This is just what I had in the fridge.  Mini Vanilla Wafers. 

There are two ways you can go here.  You could crush up the Nilla Wafers in a plastic bag and stir into yogurt.  Then fill the mini muffin cup up 3/4 of the way. 


OR you could just put the Nilla Wafer in the bottom of the mini muffin tin. 


The problem I had with this initially is that it doesn't fill the whole tin.  But we'll see how it works anyway.  Cover the Nilla Wafer with the yogurt.

Next is the messy part.  Nutella is extremely difficult to spread.  So, I used the plastic bag method.  I heated the Nutella for aprox. 20 second just to loosen it up a bit.  Then placed it in a ziplock bag. 


Cut off the tip and get to work.


Spread Nutella over the tops of all the tins.  You can pipe it all on, use a spoon, your finger, whatever you find easiest.

Then place in the freezer for aprox. 2 to 3 hours.  And then you get to enjoy this:


Serious yum.  Just the right amount of sweet to satisfy.  In terms of which method is best, I think that is probably personal preference.  The ones with the whole Nilla Wafer on the bottom had more crunch, but were messier to eat.  The ones with the Nilla Wafers all smashed up where easier to eat, but not as crunchy.  I preferred the whole Nilla Wafer myself. 

Hope you enjoy these as much as I did!

Hallie

Why We Love it Wednesday: Popcorn Awesomeness

Apr 4, 2012

For my first "Why we love it Wednesday" post, I wanted to review a really cool item. Something that would force you to drop what you're doing and rush right out to buy it. I spent an embarrassing amount of time trying to come up with a product that I love. That I just really couldn't do without. I looked around my house and saw tons of items that make my kids lives better, but I wanted this to be all about ME! Me, me, me!
I went to the kitchen and there it was, just sitting there all innocent like. Pretending that it wasn't aware of its awesomeness. But I know...and now you will too.


Introducing, The Nordic Ware Microwave Popcorn Popper. It is one of my favorite products and is by FAR the best $8.99 I ever spent.

My two favorite foods are apples and popcorn. I eat both every day and would be more than happy if forced to live solely on these two yummies (maybe a piece of peanut butter toast every now and then...). Last year when I started reading reports of how harmful the coating inside microwave popcorn bags could be, I was pregnant and became worried and immediately stopped eating my favorite snack. I had always eaten the low fat variety of the microwaved good stuff, and though my husband loves stove top popcorn, I wasn't willing to eat something so full of oil. I searched the Internet for an answer and found several posts on making popcorn in a brown paper bag. I tried this several times, and it was ok, but the popcorn wasn't fluffy and I wasted a lot of kernels that didn't pop. I bought a Sunbeam air popper, and it was a waste. A big, loud, messy waste.

One day I was at Target (where all good things happen), buying ranch flavored popcorn seasoning to make homemade ranch "Doritos," and spotted a yellow bowl on the top shelf. I thought it was ridiculous to spend $8.99 on a bowl to serve popcorn in. I'm pretty sure I rolled my eyes. I do that sometimes. So I took it off the shelf to scoff at it and saw that it claimed to pop popcorn in my microwave with or without oil! For $8.99? Bargain! My opinions can change quickly...

That night I made my first bowl, and fell in love. Its so simple. A half a cup of kernels into the bowl, into the microwave, and done. There is the option to use oil, but I haven't. I bought my mother one and she does use the oil and says that it is very good. After the popcorn is done (mine is perfect after 2 minutes and 30 seconds but every microwave is different) I spray it with butter spray and sprinkle a variety of popcorn seasonings. Perfect, perfect, perfect. For a quick snack, it's a great option because popcorn is healthy and because you can decide how much you want to make for easy portion control.

Buy one...you'll like it.

*Please note that these opinions are solely my own and I was not compensated in any way to provide them.  Now go buy a popcorn bowl!
Blog contents © Try One ... 2012. Blogger Theme by Nymphont.